
The content on this page is kept as an archive of the original game's mechanics.
Shards can differ from what you see here for creative or balance purposes.
Getting Started
This guide will explain the basics to get yourself familiarized with the game. If you're new to Akarra, the information below will be of great help. Advanced players may also find this information useful.
During this guide I will refer to Whispers in Akarra as "WiA".
Creating an Account
You are not allow to create accounts manually when you start playing Whispers in Akarra. This is because Akarra is a very special game with a very special feel and pace. Instead, you'll need to connect to the game using the "anonymous" accounts and search out the NPC (non-playable-character) called Cecilia Lifebringer. She will help you create a new account.
To connect to the anonymous account, you enter anon as the username and anon as the password. If the account is already bing used by another new player, you can use anon1, anon2, anon3, anon4, or anon5. All anon accounts have anon as the password.
Learning the Interface
The screenshot below was taken from WiA version pa13.
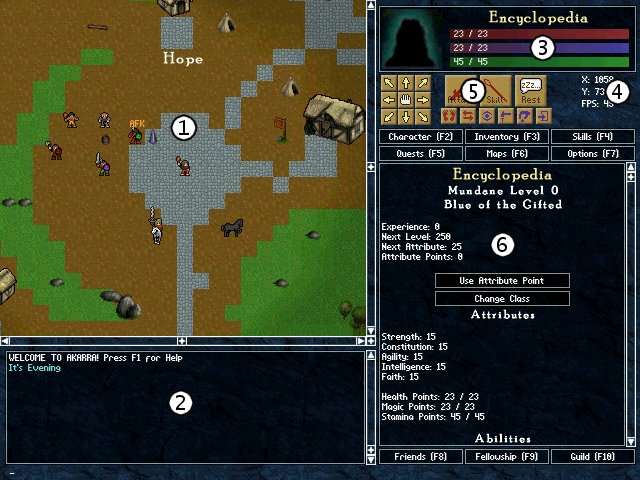
- World View: This is where all of the action takes place in WiA.
- Chat Interface: Allows you to talk to other players in the game.
- These 3 bars represent Health Points (red), Magic Points (blue), and Stamina Points (green) respectively.
- Displays the location of your character on the map in X and Y coordinates. Under your global position is your FPS (frames per second). FPS is your computer speed, not server speed/lag.
- These are the command icons which allow you to perform actions in WiA:
 Attack Target: Attack and fight monsters or other players (PvP can only be done in the Arena).
 Skill: Use a spell or a skill on a monster or fellow conrad.
 Rest: Rest to regain lost HP, MP, and/or SP after you've been wounded in battle.
 Follow Target: This will allow you to follow another player automatically wherever s/he goes.
 Trade with Target: Trade items and money with other players in WiA.
 Look: Examine equipment, items, and objects (in the world view).
 Use / Open: Use items on yourself or on other items.
 Pick Up: Pick up items laying on the ground.
 Enter: Enter and exit dungeons or move up and down stairs.
 Move Northwest
 Move North
 Move Northeast
 Move West
 Stop
 Move East
 Move Southwest
 Move South
 Move Southeast
- Menu Buttons: These buttons allow you to navigate through the various menus.
- Menu Screen: Displays various information depending on the menu you chose.
Navigating the Menu Screens
Clicking on a menu button will display information in the menu screen. Below is a list of the menu buttons and the information they contain.
You can press F1 at any time to display the Help menu.

-
Name: Displays your name in WiA.
-
Mundane Level 0: All characters start as Mundane until you acquire the skills to advance to different classes. Level displays your current experience level.
-
Color of the Deity: - Displays your soul color and religion.
-
Experience: Displays your total amount of experience points.
-
Next Level: You will gain a level when you reach the amount of experience displayed here.
-
Next Attribute: You will gain an attribute point when you reach the amount of experience displayed here.
-
Attribute Points: Displays the current amount of attribute points which you may assign to any of the attributes (listed below). To assign an attribute point, click the "Use Attribute Point" button and select the attribute of your choice.
-
Change Class: Allows you to change class to the different ones that are available. Before you change class, be sure to click and fully read the help section on classes.
Attributes
-
Strength: Your physical power. It allows you to wield heavier weapons and wear heavier armor. It also increases the amount of damage you inflict in melee combat.
-
Constitution: Your physical health. It increases your health points and stamina points. It also increases your resistance towards red, blue, and yellow-based spells.
-
Agility: Describes your nimbleness and dexterity. High agility makes it easier to hit targets as well as to avoid enemy blows. Agility adds to your attack rating as well as your armor class. Agility is also a requirement for certain items.
-
Intelligence: The power of your mind. It increases your cast rating. It makes your spells more effective, makes the range of your spells longer, and protects you against green-based spells. Intelligence is also an important item requirement.
-
Faith: How well you work with divine powers. Faith increases your magic points and your resistance against white-based spells. Faith is also very important for items.
-
Health Points: Displays your current amount / total amount of health.
-
Magic Points: Displays your current amount / total amount of magic.
-
Stamina Points: Displays your current amount / total amount of stamina.
Abilities
- Attack Rating: Determines your ability to successfully hit during combat (especially monsters and players with a high armor class).
- Cast Rating: Determines the strength and range of your spell.
- Minimum Damage: The minimum physical damage you can do in combat.
- Maximum Damage: The maximum physical damage you can do in combat.
- Armor Class: Determines your ability to successfully dodge blows during combat.
- Resist White: Resistance to white-based spells.
- Resist Red: Resistance to red-based spells.
- Resist Green: Resistance to green-based spells.
- Resist Blue: Resistance to blue-based spells.
- Resist Yellow: Resistance to yellow-based spells.

Equipment
The equipment slots displays any weapons, armor, and items you are currently wearing. To equip an item, simply drag it from the backpack and onto the equipment slots. It doesn't matter which slot you drop it in because the item will automatically be placed into the correct slot (if equippable).
Backpack
Your backpack holds all of your weapons, armor, items, food, etc. For every 10 levels of experience you achieve, you will gain 1 extra row of 5 empty slots. The maximum amount of rows you can acquire is 6 (30 empty slots total).
Money
Coins: Displays the amount of coins you have / the total amount of coins you can hold. Coins are divided into 3 currencies: copper coins (cc), silver coins (sc), gold coins (gc).
- 100cc = 1sc
- 10sc = 1gc
Do not worry about converting your coins. The game will automatically do it for you.
Drengel: It costs 15cc to buy a drengel and 8cc to sell one. If tranfered 50 at a time, a drengel is worth 9.9cc.
Quats: It costs 15cc to buy a drengel and 8cc to sell one. If tranfered 50 at a time, a quat is worth 9.9cc.
Selling Your Drengel & Quats:
- 1 = 8cc
- 10 = 95cc
- 50 = 4sc and 95sc

Skills and Spells
Displays all of the skills and spells that you have learned. To learn a skill you must find a Skill Scroll and read it. To read a scroll simply drag it from your backpack to your equipment slots (or you may "use" the scroll on yourself in the same manner).
In order to assign a passive skill or spell, click the icon next to the gem slots. This will assign it to your active list. To change lists, press ctrl-1, ctrl-2, or ctrl-3. If the skill or spell is already in a different list, it will be moved to the active list. Once skills or spells are assigned to a list, use the tab button to switch between the skills or spells. Click the skills button to use the skill or spell, or press ctrl-s to use or cast the skill or spell.
Unassigned Proficiency Gems
Each gem increases the power of a skill or spell by one step. A skill can have up to 5 gems, one of each color. You receive new gems as you progress levels (1 gem every level and 2 gems every five levels). To get a description of the skill or spell, click the name of it. On that page you will read what it does and often with a guide (ie - 1 gem for every 5 levels).

Quests
This menu keeps track of all your quests, their objectives, and the ones you have finished. To obtain a quest talk to a NPC. Some quests will only be given to you if you meet certain criteria. Once you have completed an objective in the quest, the objective will turn green until the quest is complete and you talk to the person who gave it to you.

Game Maps
- View Worldmap: Click this button to view the map of the entire world.
- View Sectormap: Click this button to view the map of the sector you are in.
- Neighborhood: This is an updated pannel of your surroundings.

Game Options
- Help!: Click this button to display the Help menu.
- Set Chat Prefix: Click this button to set a chat prefix. Setting a chat prefix will automatically enter the prefix when you type in the chat interface.
- Message Log: Click this button to display a fullscreen gox with the recent messages you have sent.
- Message Settings: Click this button to configure which types of messages will (and will not) be displayed or where they should be displayed.
- Draw Player Names: Checking this box will display the names of the players above their heads.
- Draw Action Progressbar: Checking this box will display the progress bar. The progress bar is displayed when you perform certain actions such as fighting or using/equipping an item.
- Show Experience Drop-off (disabled): Checking this box will display how much experience was dropped off after killing a monster. To learn more about experience drop-offs please click here.
System Options
- Play Sound Effects: Checking this box will turn on the sound effects.
- Toggle Fullscreen: Click this button to switch to full screen mode or window mode.
- Quite Game: Click this button to quit WiA and exit the game.

Connected Friends
This menu displays all of the players that you have seen and have added to your Friends List. To add or removesomeone to your list, type /friends <name> <0/1>. 0 is to remove a player, and 1 is to add the player. Also clicking the Add Friend button works too. Clicking on a player's name makes it easier to send them a private message. The number in (parentheses) denotes the player's current level. Your level can be shown or hidden by using /lock and /unlock. Please see the Commands Guide for more details on those commands.
Information
Characters marked with a ¤ symbol are admins.
Display Join/Leave Messages: Displays a message in the world view when a player joins or leaves WiA.

- Create Fellowship: Click this button to create a fellowship.
- Join Fellowship: Click this button to join an existing fellowship.
For more information about fellowships please click here.

For more information about guilds please click here.
Exploring the World
If you're not sure what to do, please read the short summary below. I'm not going to go into full details on this, but it should be enough to get you started.
You begin in the city of Hope. Your first objective should be to talk to Nicholas the Elder. He will provide you with some important information so listen very carefully to what he says. He also provides you with your first quest.
After speaking with Nicholas, head south-southwest on the trail as he has instructed and you will find Rupert the Farmer. Rupert also gives you a quest.
At this point you should fight rabbits and rats to gain a few levels. After you have completed Rupert's quest, the world is yours for the exploration. Head north onto the peninsula and explore everywhere. If you meet a few other players on your journey, it would be a good idea to form a group and create a fellowship. Fellowships will help you to grow strong quickly and they are a key to survival.